Exporting Content from Your Serena Collage Instance
What's New
Client Case Study
Check out the Sarah Lawrence case study about the College's CMS use and migration from Serena Collage to Cascade Server.
- Login to Serena Collage with a user who has “Manage Deploy Assets” permissions.
- Select the project where your website’s content is located.
- Click the “Deploy” tab and then select the “Setup” view.
- Click the “Web Server” icon
 on the left of the screen to set-up login and location details for the web server to which you'd like to export the Serena Collage content. (Ideally, this would be set to the same web server where you will have the Cascade Server Migration Tool installed. If not, then the exported content will have to be moved manually.)
 - Click on the “New” icon from the gray bar across the top of the page. A new window will pop up and allow you to provide details for logging into your web server where you would like to export your Serena Collage content. For further instructions what to put for any of the fields while in this window, you may click the “Help” link located at the top right of the page.
- After filling out all the fields, click “OK” to create the new "Web Server."
- After creating a "Web Server" within Serena Collage, you’ll need to create a “Location.”
- While still in the Deploy -> Setup view, click on the “Location” icon on the left page.
- Click on the “New” icon that appears at the top of the page. A new window will appear.
- Type in a recognizeable name and also select the Web Server we created previously, then click “OK” to finish creating the Location.
- Click on the “Deploy Map” icon while still in the Deploy -> Setup view.
- Click on the “New” icon like before and a new window will pop up.
- Provide an appropriate name for the Deploy Map in the “Name:” field.
Then add the Location we just created by following the three steps below:
1. Select the folder or root of the website’s Serena Collage content from the left column.
2. Next, click the Add button to open the “Add Deployment Locations” dialog box. Use the dialog box to select the location you just created.
3. Click OK, and the location for the selected root appear in the WebSite list.
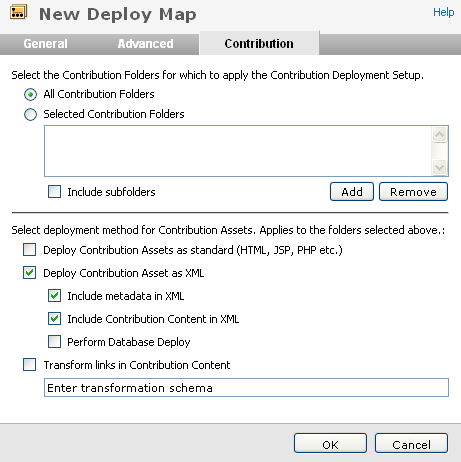
Next, click the “Contribution” tab from within the same window and fill out the fields like shown in the screenshot shown below:
- Click OK to finish creating the new Deploy Map.
- Go to the Deploy -> Activities view and click the “Deploy” icon .
- In the field “Select deploy map," select the Deploy Map we created earlier.
- Finally, click "OK" to export your Serena Collage content into XML files that our Cascade Server Migration Tool can use to create new assets within Cascade Server.